
Building a Virtual Remote Control for a Verizon FIOS DVR
I recently had the need to control my FIOS DVR remotely and as the iPhone app only works when on the same local network as the unit that was not an option.
So this project makes use of a Raspberry Pi with Node-Red and LIRC software installed to accomplish the same goal, along with a couple of features missing from the real remote.
Hardware
- Raspberry Pi Zero & Power Supply
SD Card >=16MB - Keyes KY-005 IR transmitter module
- Keyes KY-022 Infrared Receiver Module
- Transistor NPN 2N2222 or similar
- One Resistor 10K
- Two Resistors 220
- Circuit Board and Connecting Wire
Software
- Operating System: Raspian GNU/Linux (buster) Debian Version 10.11
The latest release of Raspian (now called Raspberry Pi OS) is available from here. You only need the Lite version.
I cannot guarantee that this project will work on the latest version. You can download the version I used from here.
Either way, I suggest you use the Raspberry Pi Imager to put the OS on the SD Card. - Node Red
Installation
- Install the operating system per the instructions provided
- Log in to the pi user
- Update the operating system with:
- sudo apt-get update
- sudo apt-get upgrade
- Reboot (sudo reboot)
- Login to the pi user
- sudo apt-get install lirc
- sudo nano /etc/lirc/lirc_options.conf
and change these lines
driver=default
device=/dev/lirc0 - sudo nano /boot/config.txt
and change these lines
dtoverlay=gpio-ir,gpio_pin=18
dtoverlay=gpio-ir-tx, gpio_pin=17 - Disable the default configuration with
sudo mv /etc/lirc/lircd.conf.d/devinput.lircd.conf /etc/lirc/lircd.conf.d/devinput.lircd.conf.hold - Get the FIOS configuration file using
sudo wget -O /etc/lirc/lircd.conf.d/FIOS.lirc.conf https://www.stearman.com/wordpress/wp-content/uploads/sourcefiles/FIOS.lircd.conf - Check the lircd status with
sudo systemctl stop lircd.service
sudo systemctl start lircd.service
sudo systemctl status lircd.service
The last command will display something like the below. Don’t worry about the warnings, they are spurious, but if it shows errors you need to check your work.
lircd.service – Flexible IR remote input/output application support
Loaded: loaded (/lib/systemd/system/lircd.service; enabled; vendor preset: enabled)
Active: active (running) since Thu 2021-10-28 14:19:00 EDT; 5s ago
Docs: man:lircd(8)
http://lirc.org/html/configure.html
Main PID: 6926 (lircd)
Tasks: 2 (limit: 725)
CGroup: /system.slice/lircd.service
└─6926 /usr/sbin/lircd –nodaemonOct 28 14:19:00 ircontroller lircd-0.10.1[6926]: Warning: /etc/lirc/lircd.conf.d/FIOS.lirc.conf: QIP7232-2: Invalid code A: (null)
Oct 28 14:19:00 ircontroller lircd-0.10.1[6926]: Warning: /etc/lirc/lircd.conf.d/FIOS.lirc.conf: QIP7232-2: Invalid code B: (null)
Oct 28 14:19:00 ircontroller lircd-0.10.1[6926]: Warning: /etc/lirc/lircd.conf.d/FIOS.lirc.conf: QIP7232-2: Invalid code C: (null)
Oct 28 14:19:00 ircontroller lircd-0.10.1[6926]: Warning: /etc/lirc/lircd.conf.d/FIOS.lirc.conf: QIP7232-2: Invalid code D: (null)
Oct 28 14:19:00 ircontroller lircd-0.10.1[6926]: Warning: /etc/lirc/lircd.conf.d/FIOS.lirc.conf: QIP7232-2: Invalid code Mute: (null)
Oct 28 14:19:00 ircontroller lircd-0.10.1[6926]: Warning: /etc/lirc/lircd.conf.d/FIOS.lirc.conf: QIP7232-2: Invalid code VolUp: (null)
Oct 28 14:19:00 ircontroller lircd-0.10.1[6926]: Warning: /etc/lirc/lircd.conf.d/FIOS.lirc.conf: QIP7232-2: Invalid code VolDown: (null)
Oct 28 14:19:00 ircontroller lircd-0.10.1[6926]: Warning: /etc/lirc/lircd.conf.d/FIOS.lirc.conf: QIP7232-2: Invalid code Asterisk: (null)
Oct 28 14:19:00 ircontroller lircd-0.10.1[6926]: Warning: /etc/lirc/lircd.conf.d/FIOS.lirc.conf: QIP7232-2: Invalid code Hash: (null)
Oct 28 14:19:00 ircontroller lircd-0.10.1[6926]: Notice: lircd(default) ready, using /var/run/lirc/lircd - Reboot with sudo reboot
- Install Node Red. The easiest way to do this is to follow the instructions found on this website.
- Reboot with sudo reboot
- Install some static files needed for the project by using these commands:
cd /home/pi/.node-red
mkdir static
cd static
wget https://www.stearman.com/wordpress/wp-content/uploads/sourcefiles/static_files.tgz
tar -xzf static_files.tgz
rm static_files.tgz - Make the following change to the node red settings file using:
nano /home/pi/.node-red/settings.js
Find the line containing //httpStatic using the Ctrl/W key and add this immediately below
httpStatic: ‘/home/pi/.node-red/static/’,
then Ctrl/X, Y and Enter to save the change. - Restart Node-Red with
node-red-stop
node-red-start
(Note the instructions near the top of the output on how to make Node Red start automatically on reboot) - In a browser go to the website noted in the same startup text. It will be something like http://<your ip>:1880
- Explaining how to use Node Red is beyond the scope of this project. However you will need to make sure that the following nodes are installed. Some may already be so:
node-red-contrib-queue-gate
node-red-node-pi-gpio
Use Manage Pallette in the main menu to add them if they are missing. - Import the flows by downloading the file from here and using Import function in the Node Red browser main menu, import it and click Deploy.
Construction
The following assumes you are comfortable with the construction of circuit boards that connect to the GPIO interface of the Raspberry Pi. The most important rule to remember is:
Make no connections or adjustments to the circuit connected to the GPIO when the Raspberry Pi is powered up.
This is the circuit diagram of the project:
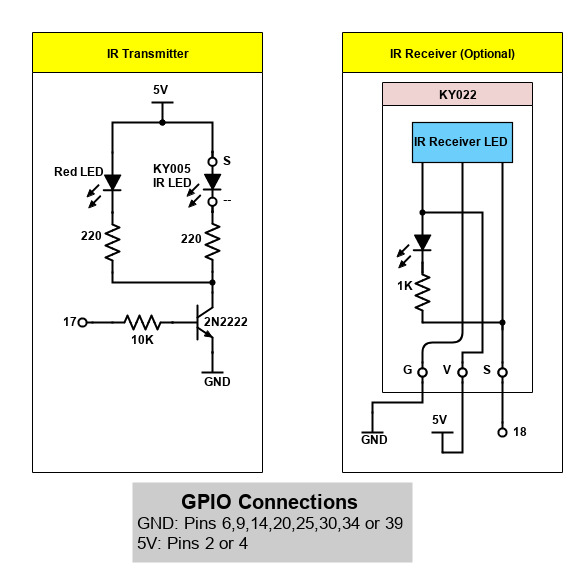
If you are going to use the FIOS configuration file you uploaded then there is no need to build the IR Receiver circuit. This is only if you want to have the Pi learn some other remote controller codes and save them in your own configuration file. The command to learn codes is irrecord and more information on how to use it can be found with the command man irrecord or by searching on the web.
The purpose of the red LED in the transmitter circuit is to give a visual indication that signals are being transmitted, as infra-red is invisible.
Testing and Use
Once the project is built you will need to test it. I recommend breadboarding first before committing it to a printed circuit board. Position the project near the FIOS DVR with the IR LED pointing towards it. 12-24″ should be enough. Turn on the TV so you can see if the commands are taken.
Open the virtual remote in a web page. The address will be something like http://<your ip>:1880/fios and will show a remote like the one above (but without the annotation). Click on a few buttons to see that they work. The red LED should flash briefly as each command is transmitted by the IR LED. If the red LED does not flash make sure it it the right way around in the circuit. If it does, but nothing happens on the TV, make sure the IR LED is the right way around.
The flow circuit is designed to allow queueing of commands, with each one sent 1 second apart. So there is no need to wait for one command to complete before clicking another button on the remote.
When you click a button the “LEDs” at A will flash. There are 3 of them distributed down the control because the entire controller is not visible on a small device like an iPhone, so there will always be at least one visible at all times.
The symbol at B will cause the Raspberry Pi to be rebooted. A confirming dialog will appear before that happens.
The five buttons at C allow for automatic repeating of a button press. It defaults to 1, but if you want to send 3 down commands for example, click the 3 so it turns green, then click the down button once, 3 down commands will be sent one second apart.
Patching LIRC V0.10.1
There is a bug in the daemon file /usr/sbin/lircd which causes the irsend command to hang if more that 2 commands are sent in quick succession. I have created a page here describing how to patch and build the LIRC source and update the lircd file to fix this problem.
References
This is a fairly complex project and your mileage may vary considerably. Unfortunately I am not in a position to answer questions if things don’t go well for you. For example, I cannot help if you use different hardware or release of the operating system software. The Internet is always your friend when you need an answer, and I developed this project entirely by researching there. It was not necessary for me to ask any questions of the various web site authors. I used a Pi Zero W for the project, but there is no obvious reason why a Pi-3 or Pi-4 should not work too. They’re just overkill!
Here are some sites that I found useful. All links open in a new tab (assuming they open at all!). If the instructions there conflict with mine, go with mine!
- https://www.instructables.com/Setup-IR-Remote-Control-Using-LIRC-for-the-Raspber/
- https://devkimchi.com/2020/08/12/turning-raspberry-pi-into-remote-controller/
- https://www.hackster.io/achindra/learning-ir-codes-with-raspberry-038602
- https://www.raspberry-pi-geek.com/Archive/2015/10/Raspberry-Pi-IR-remote
- https://osoyoo.com/2016/12/15/raspberrypi-ir-remote/
- https://www.instructables.com/Record-Infrared-Codes-of-Any-Remote-Control-Unit-f/
- https://www.digikey.com/en/maker/blogs/2021/how-to-send-and-receive-ir-signals-with-a-raspberry-pi
- https://thepihut.com/blogs/raspberry-pi-tutorials/raspberry-pis-remotes-ir-receivers

Recent Comments